Basically when you create a user programmatically we may face issue in password creation.
To avoid that its always better to go with the default APIs of liferay.
For Ex:
UserLocalServiceUtil.addUser(creatorUserId, companyId, autoPassword, password1, password2, autoScreenName, screenName, emailAddress, facebookId, openId, locale, firstName, middleName, lastName, prefixId, suffixId, male, birthdayMonth, birthdayDay, birthdayYear, jobTitle, groupIds, organizationIds, roleIds, userGroupIds, sendEmail, serviceContext);
But you may come across some place where you may need to use
UserLocalServiceUtil.addUser(user);
So at that time We need to encrypt the plain text password
So we can use Liferay's PasswordEncryptorUtil to encrypt our plain text.
user.setPassword(PasswordEncryptorUtil.encrypt("test"));
user.setPasswordUnencrypted("test");
user.setPasswordEncrypted(true);
UserLocalServiceUtil.addUser(user);
Even we can use
PasswordEncryptorUtil.encrypt(algorithm, plainTextPassword, encryptedPassword);
to select the algorithm.
Showing posts with label DXP. Show all posts
Showing posts with label DXP. Show all posts
Sunday, 26 November 2017
Saturday, 25 November 2017
03:30
Dynamic query for liferay expando table
Dynamic Query for Expando Value
DynamicQuery query = DynamicQueryFactoryUtil.forClass(ExpandoValue.class,PortalClassLoaderUtil.getClassLoader()).add(PropertyFactoryUtil.forName("classPK").eq(themeDisplay.getUserId()));
List<ExpandoValue> li= new LinkedList<ExpandoValue>(ExpandoValueLocalServiceUtil.dynamicQuery(query));
DynamicQuery query = DynamicQueryFactoryUtil.forClass(ExpandoValue.class,PortalClassLoaderUtil.getClassLoader()).add(PropertyFactoryUtil.forName("classPK").eq(themeDisplay.getUserId()));
List<ExpandoValue> li= new LinkedList<ExpandoValue>(ExpandoValueLocalServiceUtil.dynamicQuery(query));
Friday, 24 November 2017
18:08
Assign roles programmatically
Role role = RoleLocalServiceUtil.getRole(company.getCompanyId(), usery[0]);
UserLocalServiceUtil.addRoleUser(role.getRoleId(), user.getUserId());
UserLocalServiceUtil.updateUser(user);
UserLocalServiceUtil.addRoleUser(role.getRoleId(), user.getUserId());
UserLocalServiceUtil.updateUser(user);
Thursday, 23 November 2017
03:30
Upload data and store in database
CSV files can be used to do bulk import.
Open CSV:
It is a very simple csv (comma-separated values) parser library for Java. It was developed because all of current csv parsers I've come across don't have commercial-friendly licenses.
Download Open CSV jar file from OpenCSV
Add jar to your portlet
Just write file tag in your jsp page
<aui:form action="<%=BulkImportURL.toString()%>" method="post" name="fm" enctype="multipart/form-data">
<aui:input name="QuestionAnswerAttach" id="QuestionAnswerAttach" type="file" label="Upload your Question Answer key"></aui:input>
<aui:button type="submit" value="Upload Questions"/>
</aui:form>
Then in your action class
Inside your method write
And you can store the value in database.
Open CSV:
It is a very simple csv (comma-separated values) parser library for Java. It was developed because all of current csv parsers I've come across don't have commercial-friendly licenses.
Download Open CSV jar file from OpenCSV
Add jar to your portlet
Just write file tag in your jsp page
<aui:form action="<%=BulkImportURL.toString()%>" method="post" name="fm" enctype="multipart/form-data">
<aui:input name="QuestionAnswerAttach" id="QuestionAnswerAttach" type="file" label="Upload your Question Answer key"></aui:input>
<aui:button type="submit" value="Upload Questions"/>
</aui:form>
Then in your action class
Inside your method write
UploadPortletRequest uploadPortletRequest = PortalUtil.getUploadPortletRequest(actionRequest);
java.io.File document = uploadPortletRequest.getFile("QuestionAnswerAttach");
CSVReader readers = new CSVReader(new FileReader(document));
List<String[]> myEntries = readers.readAll();
for(int i=0;i<myEntries.size();i++){
String[] s = myEntries.get(i);
System.out.println(s[0]);
java.io.File document = uploadPortletRequest.getFile("QuestionAnswerAttach");
CSVReader readers = new CSVReader(new FileReader(document));
List<String[]> myEntries = readers.readAll();
for(int i=0;i<myEntries.size();i++){
String[] s = myEntries.get(i);
System.out.println(s[0]);
}
And you can store the value in database.
Wednesday, 22 November 2017
18:06
Liferay autofields
Use the following code in your jsp page
<div id="link-fields">
<div class="lfr-form-row lfr-form-row-inline">
<div class="row-fields">
<aui:input fieldParam='linkNumber0' id='linkNumber0' name="linkNumber0" label="Links" />
</div>
</div>
</div>
<aui:script use="liferay-auto-fields">
new Liferay.AutoFields(
{
contentBox: '#link-fields',
fieldIndexes: '<portlet:namespace />linksIndexes'
}
).render();
</aui:script>
Use this in your action method
String linksIndexesString = actionRequest.getParameter(
"linksIndexes");
System.out.println("=============linksIndexesString=="+linksIndexesString);
int[] linksIndexes = StringUtil.split(linksIndexesString, 0);
for (int linksIndex : linksIndexes) {
String number = ParamUtil.getString(actionRequest, "linkNumber" + linksIndex);
System.out.println("=============linkNumber=="+number);
}
<div id="link-fields">
<div class="lfr-form-row lfr-form-row-inline">
<div class="row-fields">
<aui:input fieldParam='linkNumber0' id='linkNumber0' name="linkNumber0" label="Links" />
</div>
</div>
</div>
<aui:script use="liferay-auto-fields">
new Liferay.AutoFields(
{
contentBox: '#link-fields',
fieldIndexes: '<portlet:namespace />linksIndexes'
}
).render();
</aui:script>
Use this in your action method
String linksIndexesString = actionRequest.getParameter(
"linksIndexes");
System.out.println("=============linksIndexesString=="+linksIndexesString);
int[] linksIndexes = StringUtil.split(linksIndexesString, 0);
for (int linksIndex : linksIndexes) {
String number = ParamUtil.getString(actionRequest, "linkNumber" + linksIndex);
System.out.println("=============linkNumber=="+number);
}
03:30
Navigation parent page clickable
When we create child pages we will not be able to navigate to parent page.We can do only hover on it.And we can see only the list of child pages.
To make parent page navigation clickable.
Create a custom theme,
And In
templates/navigation.vm
Remove the below line
#set ($nav_item_link_css_class="dropdown-toggle")
Then parent page will be clickable and you can navigate.
To make parent page navigation clickable.
Create a custom theme,
And In
templates/navigation.vm
Remove the below line
#set ($nav_item_link_css_class="dropdown-toggle")
Then parent page will be clickable and you can navigate.
Tuesday, 21 November 2017
18:01
Exporting data into csv format
Use Open CSV to export the data.
Here I have given download option for the whole table.
I am getting the whole table data as a list.And making csv values and storing in csv file.
public void exportEvent(ActionRequest actionRequest,ActionResponse actionResponse) throws SystemException, IOException{
List<stuadmission> admissions = stuadmissionLocalServiceUtil.g
CSVWriter writer = new CSVWriter(new FileWriter("/home/filename.csv"), '\t');
for (stuadmission student : admissions){
String str = Integer.toString(student.getAd
String str2 = str + ","+ student.getBatch();
String[] strings = str2.split(",");
writer.writeNext(strings);
writer.close();}
}
List<stuadmission> admissions = stuadmissionLocalServiceUtil.g
CSVWriter writer = new CSVWriter(new FileWriter("/home/filename.csv"), '\t');
for (stuadmission student : admissions){
String str = Integer.toString(student.getAd
String str2 = str + ","+ student.getBatch();
String[] strings = str2.split(",");
writer.writeNext(strings);
writer.close();}
}
03:30
Including structure form in our custom portlet
Step 1: Create a structure in portal.
To know how to create structure :
http://liferayplanet.blogspot.in/2015/01/structure-and-template-in-liferay-62.html
Step 2: Then in your jsp page
long structureId= 12345;
ServiceContext serviceContext = ServiceContextFactory.getInstance(request);
DDMStructure ddm = null;
ddm = DDMStructureLocalServiceUtil.getDDMStructure(structureId);
Fields newFields = DDMUtil.getFields(
ddm.getStructureId(), serviceContext);
Here we get ddmstructure and we will use DDMUtil.getFields to get all the form fields.
Step 3:Then use the below tag
<%@ taglib uri="http://liferay.com/tld/ddm" prefix="liferay-ddm"%>
<liferay-ddm:html
classNameId="<%= PortalUtil.getClassNameId(DDMStructure.class)%>"
classPK="<%= ddm.getStructureId() %>"
fields="<%= newFields %>"
/>
Step 4:Then to get in controller use
ServiceContext serviceContext;
DDMStructure ddmStructure = null;
serviceContext = ServiceContextFactory.getInstance(
JournalArticle.class.getName(), actionRequest);
Object[] contentAndImages = null;
ddmStructure = DDMStructureLocalServiceUtil
.getDDMStructure(structureId);
Locale locale = LocaleUtil.getDefault();
contentAndImages = getContentAndImages(
ddmStructure, locale, serviceContext);
content = (String) contentAndImages[0];
public static Object[] getContentAndImages(
DDMStructure ddmStructure, Locale locale,
ServiceContext serviceContext)
throws Exception {
Fields fields = DDMUtil.getFields(
ddmStructure.getStructureId(), serviceContext);
Map<String, byte[]> images = getImages(fields, locale);
return new Object[] {
JournalConverterUtil.getContent(ddmStructure, fields), images
};
}
protected static Map<String, byte[]> getImages(Fields fields, Locale locale)
throws Exception {
Map<String, byte[]> images = new HashMap<String, byte[]>();
for (Field field : fields) {
String dataType = field.getDataType();
if (!dataType.equals(FieldConstants.IMAGE)) {
continue;
}
List<Serializable> values = field.getValues(locale);
for (int i = 0; i < values.size(); i++) {
String content = (String)values.get(i);
if (content.equals("update")) {
continue;
}
StringBundler sb = new StringBundler(6);
sb.append(StringPool.UNDERLINE);
sb.append(field.getName());
sb.append(StringPool.UNDERLINE);
sb.append(i);
sb.append(StringPool.UNDERLINE);
sb.append(LanguageUtil.getLanguageId(locale));
images.put(sb.toString(), UnicodeFormatter.hexToBytes(content));
}
}
return images;
}
To know how to create structure :
http://liferayplanet.blogspot.in/2015/01/structure-and-template-in-liferay-62.html
Step 2: Then in your jsp page
long structureId= 12345;
ServiceContext serviceContext = ServiceContextFactory.getInstance(request);
DDMStructure ddm = null;
ddm = DDMStructureLocalServiceUtil.getDDMStructure(structureId);
Fields newFields = DDMUtil.getFields(
ddm.getStructureId(), serviceContext);
Here we get ddmstructure and we will use DDMUtil.getFields to get all the form fields.
Step 3:Then use the below tag
<%@ taglib uri="http://liferay.com/tld/ddm" prefix="liferay-ddm"%>
<liferay-ddm:html
classNameId="<%= PortalUtil.getClassNameId(DDMStructure.class)%>"
classPK="<%= ddm.getStructureId() %>"
fields="<%= newFields %>"
/>
Step 4:Then to get in controller use
ServiceContext serviceContext;
DDMStructure ddmStructure = null;
serviceContext = ServiceContextFactory.getInstance(
JournalArticle.class.getName(), actionRequest);
Object[] contentAndImages = null;
ddmStructure = DDMStructureLocalServiceUtil
.getDDMStructure(structureId);
Locale locale = LocaleUtil.getDefault();
contentAndImages = getContentAndImages(
ddmStructure, locale, serviceContext);
content = (String) contentAndImages[0];
public static Object[] getContentAndImages(
DDMStructure ddmStructure, Locale locale,
ServiceContext serviceContext)
throws Exception {
Fields fields = DDMUtil.getFields(
ddmStructure.getStructureId(), serviceContext);
Map<String, byte[]> images = getImages(fields, locale);
return new Object[] {
JournalConverterUtil.getContent(ddmStructure, fields), images
};
}
protected static Map<String, byte[]> getImages(Fields fields, Locale locale)
throws Exception {
Map<String, byte[]> images = new HashMap<String, byte[]>();
for (Field field : fields) {
String dataType = field.getDataType();
if (!dataType.equals(FieldConstants.IMAGE)) {
continue;
}
List<Serializable> values = field.getValues(locale);
for (int i = 0; i < values.size(); i++) {
String content = (String)values.get(i);
if (content.equals("update")) {
continue;
}
StringBundler sb = new StringBundler(6);
sb.append(StringPool.UNDERLINE);
sb.append(field.getName());
sb.append(StringPool.UNDERLINE);
sb.append(i);
sb.append(StringPool.UNDERLINE);
sb.append(LanguageUtil.getLanguageId(locale));
images.put(sb.toString(), UnicodeFormatter.hexToBytes(content));
}
}
return images;
}
Monday, 20 November 2017
17:59
Create Journal Article Programmatically
We can create journal article programmatically by using add article method
JournalArticleLocalServiceUtil.addArticle (10198, 10181, 0, nameMap, nameMap,content, "23303",ddmTemplate.getTemplateKey(), serviceContext);
To create the title map and description map use localizationutil
Creating titlemap:
String mycustomwebcontent = "New title";
Map<Locale,String> nameMap = LocalizationUtil.getLocalizationMap(mycustomwebcontent);
In template key and structure key pass your structure and template key.
And use servicecontext object
ServiceContext serviceContext = ServiceContextFactory.getInstance(request);
03:30
AUI Multiple Select Box
We need to give multiple="true" in the normal select box
<aui:select label="Multiple select Example" helpMessage="Choose options" name="approver" multiple="true">
<aui:option value="1">option 1</aui:option>
<aui:option value="2">option 2</aui:option>
And In controller
String[] multipleOptions = ParamUtil.getLongValues(actionRequest, "approver");
<aui:select label="Multiple select Example" helpMessage="Choose options" name="approver" multiple="true">
<aui:option value="1">option 1</aui:option>
<aui:option value="2">option 2</aui:option>
<aui:option value="3">option 3</aui:option>
</aui:select>And In controller
String[] multipleOptions = ParamUtil.getLongValues(actionRequest, "approver");
Sunday, 19 November 2017
17:55
Displaying Left and Right Navigation Arrows in Liferay AUI Datepicker
By default in aui datepicker left and right navigation arrows have some issues.
But its easy to fix.
Use the below css:
<style>
.yui3-calendarnav-prevmonth {
background: rgba(0, 0, 0, 0) url("/html/themes/classic/images/arrows/09_left.png") no-repeat scroll 0 0 !important;
}
.yui3-calendarnav-nextmonth{
background: rgba(0, 0, 0, 0) url("/html/themes/classic/images/arrows/09_right.png") no-repeat scroll 0 0 !important;
}
</style>
You can change the image as you wish.
But its easy to fix.
Use the below css:
<style>
.yui3-calendarnav-prevmonth {
background: rgba(0, 0, 0, 0) url("/html/themes/classic/images/arrows/09_left.png") no-repeat scroll 0 0 !important;
}
.yui3-calendarnav-nextmonth{
background: rgba(0, 0, 0, 0) url("/html/themes/classic/images/arrows/09_right.png") no-repeat scroll 0 0 !important;
}
</style>
You can change the image as you wish.
Saturday, 18 November 2017
17:52
Plugins Configuration - Deactivate unwanted Portlets,Themes and Layout Plugins
We may have many unwanted plugins
For Ex:
Portlet plugins : loan calculator,dictionary etc.
Theme plugins : themes which we are not using in our project
Layout plugins : layouts which we are not using in our project
So we can deactivate/activate the plugins as we need.
Step 1: Go to control panel
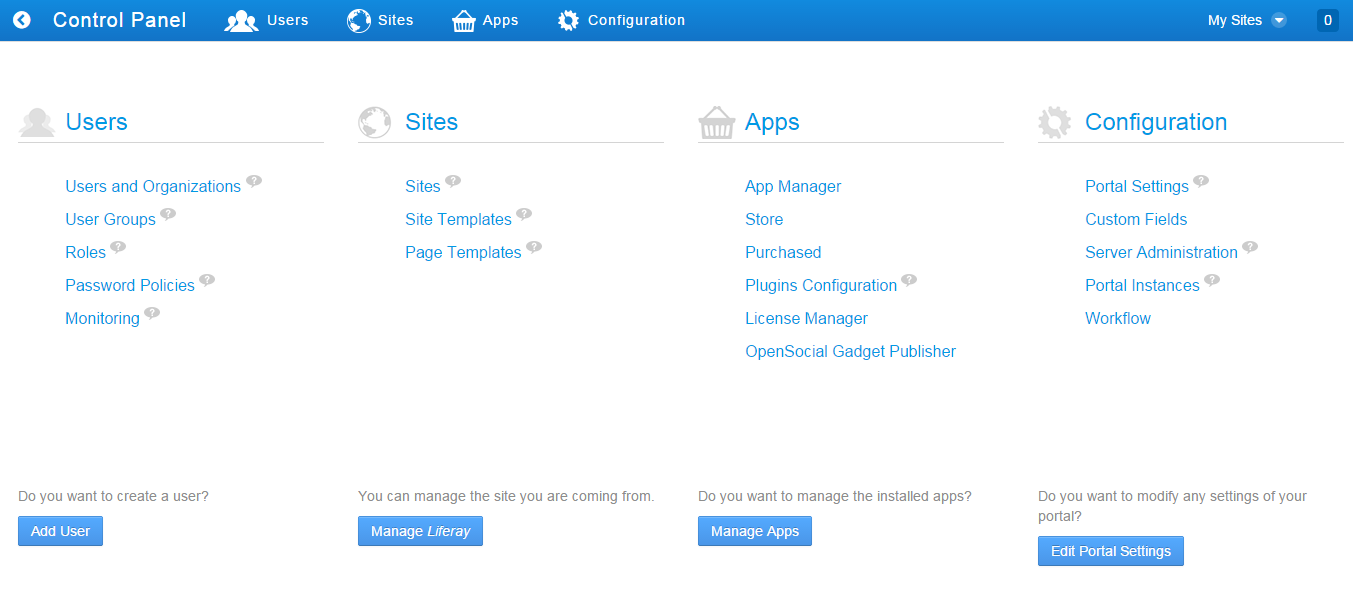
Step 2: You can see plugins configuration under apps.Click on plugins configuration

Step 3: You will be seeing three tabs like Portlet plugins,theme plugins and layout plugins
Step 4: So you will be seeing all default plugins and also our custom developed plugins.
Step 5: Just click on the plugin open and uncheck the active checkbox and save it.

Step 6: Now you will not be seeing the plugin in add portlets,manage theme or manage layout.
Step 7: Also we can set the permission to roles here by clicking on change.

Step 8: Then define permissions save it.
For Ex:
Portlet plugins : loan calculator,dictionary etc.
Theme plugins : themes which we are not using in our project
Layout plugins : layouts which we are not using in our project
So we can deactivate/activate the plugins as we need.
Step 1: Go to control panel
Step 2: You can see plugins configuration under apps.Click on plugins configuration
Step 3: You will be seeing three tabs like Portlet plugins,theme plugins and layout plugins
Step 4: So you will be seeing all default plugins and also our custom developed plugins.
Step 5: Just click on the plugin open and uncheck the active checkbox and save it.
Step 6: Now you will not be seeing the plugin in add portlets,manage theme or manage layout.
Step 7: Also we can set the permission to roles here by clicking on change.
Step 8: Then define permissions save it.
Subscribe to:
Posts (Atom)


